Syncthing开源免费跨平台的文件同步工具-利用Syncthing搭建免费同步网盘
现在免费的网盘服务非常地多,国内的就有百度网盘、阿里网盘等,基本上可以满足个人的网盘存储需要。然而,我们除了存储需要,更多的希望有一个可以同步的网盘,毕竟现在手机、电脑PC、办公室、学校、家庭等多个终端,迫切需要一个可以将文件实时同步的工具。
实时同步网盘,其实可以选择也挺多的,在十个国外优秀的网盘云存储使用对比一文中,分享的网盘OneDrive、Google Drive、Dropbox、Box.com、iCloud等都是支持自动同步备份的,只可惜这些网盘很多都是打不开的。国内的坚果云在同步这一块做得不错,但是免费的额度太少了,不能满足大量同步的需要。
本篇文章要分享的开源免费跨平台的文件同步工具Syncthing,可以实现实时同步备份搭建个人同步网盘的功能,挖站否试用了一下发现Syncthing完全可以替代市面上这些同步网盘。Syncthing可以运行在Windows、Linux、MacOS等全平台上,而且提供了安卓手机APP,功能非常强大。

Syncthing安装简单,网络要求低 ,提供完善的版本控制,更适合用于私有分享,而不适合用于公有分享。如果你想搭建一个公有分享的网盘,这里有:
- NextCloud与Seafile对比使用-NextCloud各项全能 Seafile优势突出
- ZFile自建免费公共网盘服务-支持阿里云OSS,OneDrive,FTP,S3协议等云存储
- 目录列表程序整理汇总-OneDrive,阿里云盘,GoogleDrive等各大网盘目录列表程序
PS:更新记录。
1、如果不想用第三方服务器即可让多台电脑之间直接互相同步和共享文件,可以用:Resilio Sync文件同步共享工具-Resilio Sync Docker安装与使用教程。2022.12.9
一、Syncthing下载安装
网站:
- 官网:https://syncthing.net/
- 下载:https://syncthing.net/downloads/
- 项目:https://github.com/syncthing/syncthing/releases
1.1 Windows
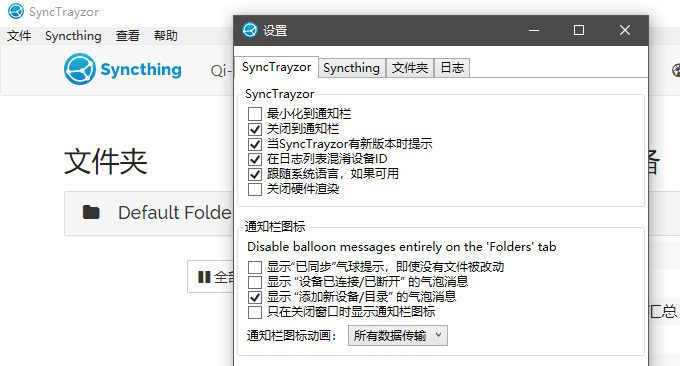
对于Windows系统,可以直接安装官方提供的安装包:SyncTrayzor,下载地址:https://github.com/canton7/SyncTrayzor/releases/latest
SyncTrayzor 是 Windows 上 Syncthing 的一个小托盘实用程序。它托管和包装了 Syncthing,使其运行起来更像原生 Windows 应用程序,而不像带有 Web 浏览器界面的命令行实用程序。
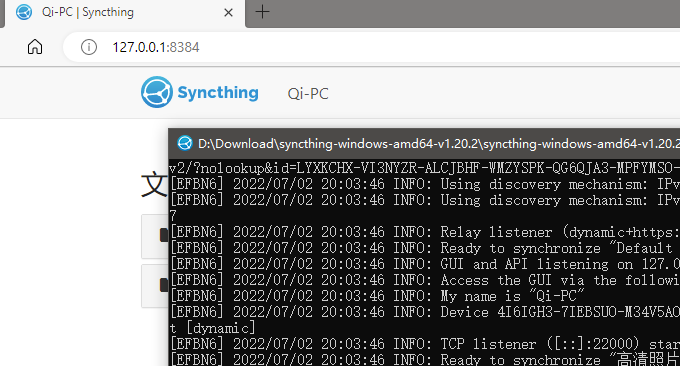
当然,官方原装的Syncthing程序也是不错的,下载地址:https://github.com/syncthing/syncthing/releases,运行后会打开命令窗口和浏览器,它的管理方式是通过Web方式管理的。
1.2 macOS
对于苹果电脑用户,请下载安装包:syncthing-macos,下载地址:https://github.com/syncthing/syncthing-macos/releases/latest
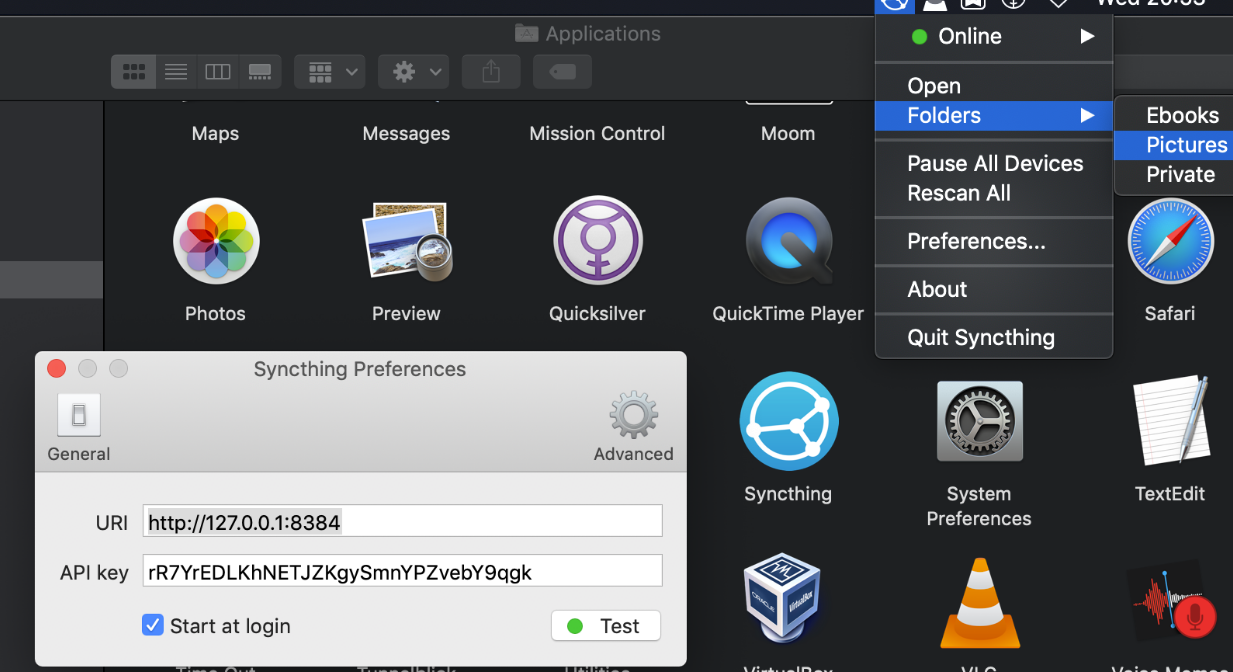
syncthing-macos支持系统首选浏览器的托盘中打开 Syncthing WebGUI、可选择在登录时启动,因此您无需将 Syncthing 设置为服务、自动更新、在 Finder 中打开共享文件夹等。
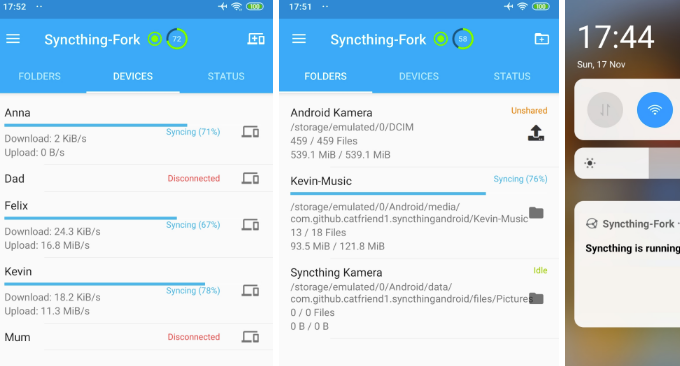
1.3 手机APP
安卓手机APP:
- Google Play :https://play.google.com/store/apps/details?id=com.nutomic.syncthingandroid
- F-Droid:https://f-droid.org/packages/com.nutomic.syncthingandroid/
开源项目:
- syncthing-android:https://github.com/syncthing/syncthing-android
- Syncthing-Fork:https://github.com/catfriend1/syncthing-android
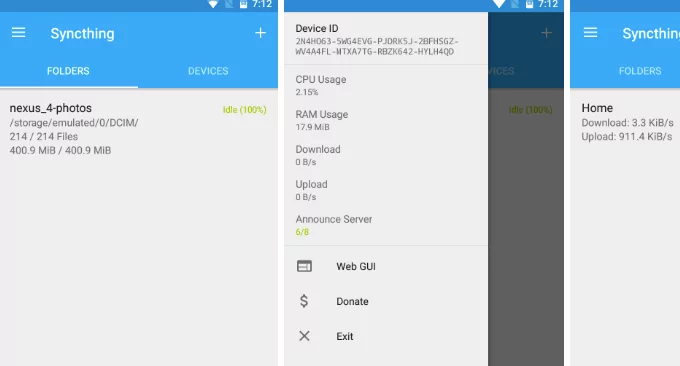
syncthing手机APP主要功能有:文件夹、设备和整体同步进度可以轻松地从 UI 中读取、“Syncthing 相机”、“每小时同步一次”以节省更多电量、可以为每个设备和每个文件夹应用单独的同步条件(对于专家用户)、无论 syncthing 是否正在运行,都可以更改文件夹和设备配置。
1.4 多终端同步?
Syncthing 采用了与 Resilio Sync (BitTorrent Sync) 类似的 P2P 分布式技术,无需中心服务器,即可让多台设备互相实时同步文件。不过前提条件是:至少有一台设备是保持在线的,否则会出现文件同步冲突。

简单的解决办法:保持一台设备始终开机在线。最佳解决办法:利用VPS主机安装运行Syncthing ,这样可实现多终端24小时实时同步。
二、Syncthing安装教程
2.1 准备一台VPS
为了保证Syncthing 可以多终端24小时实时同步,我们需要用到VPS主机。现在VPS主机也差不多是白菜价了,选购VPS主机请参考:VPS主机排行榜单。
2.2 Syncthing安装
对于安装Windows系统的VPS主机,你可以直接下载安装SyncTrayzor ,这里主要介绍Linux系统的VPS主机:
Debian/Ubuntu 系统
- 网站:https://apt.syncthing.net
首先是添加 key.
# Add the release PGP keys:
sudo curl -o /usr/share/keyrings/syncthing-archive-keyring.gpg https://syncthing.net/release-key.gpg
添加稳定版APT源.
# Add the "stable" channel to your APT sources:
echo "deb [signed-by=/usr/share/keyrings/syncthing-archive-keyring.gpg] https://apt.syncthing.net/ syncthing stable" | sudo tee /etc/apt/sources.list.d/syncthing.list
或者添加测试版源.
# Add the "candidate" channel to your APT sources:
echo "deb [signed-by=/usr/share/keyrings/syncthing-archive-keyring.gpg] https://apt.syncthing.net/ syncthing candidate" | sudo tee /etc/apt/sources.list.d/syncthing.list
开始安装命令如下:
# Update and install syncthing:
sudo apt-get update
sudo apt-get install syncthing

其它Linux系统通用安装方法:
Syncthing的更新很快,记得替换Syncthing为最新版的下载地址,具体地址请进入官网的Github下载页面。
### 下载客户端
wget https://github.com/syncthing/syncthing/releases/download/v1.20.2/syncthing-linux-arm64-v1.20.2.tar.gz
### 解压
tar -zxvf syncthing-linux-arm64-v1.20.2.tar.gz
### 进入目录
cd syncthing-linux-arm64-v1.20.2
### 复制到环境变量
cp syncthing /usr/local/bin/
Syncthing更新命令如下:
sudo syncthing --upgrade
2.3 Syncthing运行
执行命令开始运行Syncthing:syncthing

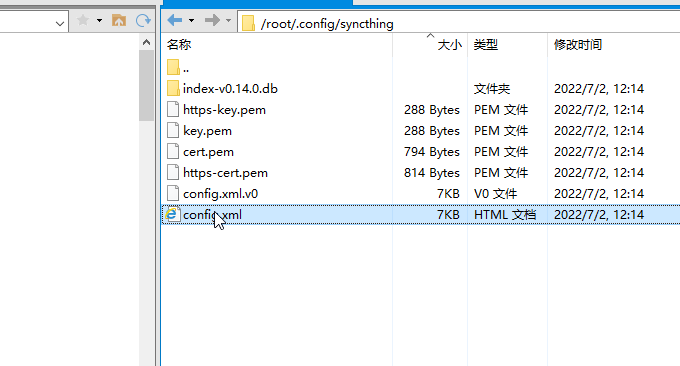
这时你会看到Syncthing运行信息了。
root@c2022061103720:~# syncthing
[start] 2022/07/02 12:14:08 INFO: syncthing v1.20.3-rc.2 "Fermium Flea" (go1.18.3 linux-amd64) deb@build.syncthing.net 2022-06-27 04:05:49 UTC [noupgrade]
[start] 2022/07/02 12:14:08 INFO: Generating ECDSA key and certificate for syncthing...
[start] 2022/07/02 12:14:08 INFO: Default folder created and/or linked to new config
[start] 2022/07/02 12:14:08 INFO: Default config saved. Edit /root/.config/syncthing/config.xml to taste (with Syncthing stopped) or use the GUI
[start] 2022/07/02 12:14:08 INFO: Archiving a copy of old config file format at: /root/.config/syncthing/config.xml.v0
[4I6IG] 2022/07/02 12:14:08 INFO: My ID: 4I6IGH3-7IEBSUO-M34V5AO-LAVDMT4-5ESZFME-OU74SOX-25TSEDS-F4N6OQN
[4I6IG] 2022/07/02 12:14:09 INFO: Single thread SHA256 performance is 217 MB/s using minio/sha256-simd (201 MB/s using crypto/sha256).
[4I6IG] 2022/07/02 12:14:09 INFO: Hashing performance is 187.82 MB/s
[4I6IG] 2022/07/02 12:14:09 INFO: Running database migration 1...
[4I6IG] 2022/07/02 12:14:09 INFO: Running database migration 2...
[4I6IG] 2022/07/02 12:14:09 INFO: Using discovery mechanism: IPv4 local broadcast discovery on port 21027
[4I6IG] 2022/07/02 12:14:09 INFO: Using discovery mechanism: IPv6 local multicast discovery on address [ff12::8384]:21027
[4I6IG] 2022/07/02 12:14:09 INFO: TCP listener ([::]:22000) starting
[4I6IG] 2022/07/02 12:14:09 INFO: Relay listener (dynamic+https://relays.syncthing.net/endpoint) starting
2022/07/02 12:14:09 failed to sufficiently increase receive buffer size (was: 208 kiB, wanted: 2048 kiB, got: 416 kiB). See https://github.com/lucas-clemente/quic-go/wiki/UDP-Receive-Buffer-Size for details.
[4I6IG] 2022/07/02 12:14:09 INFO: Loading HTTPS certificate: open /root/.config/syncthing/https-cert.pem: no such file or directory
[4I6IG] 2022/07/02 12:14:09 INFO: Creating new HTTPS certificate
[4I6IG] 2022/07/02 12:14:09 INFO: GUI and API listening on 127.0.0.1:8384
[4I6IG] 2022/07/02 12:14:09 INFO: Access the GUI via the following URL: http://127.0.0.1:8384/
[4I6IG] 2022/07/02 12:14:09 INFO: QUIC listener ([::]:22000) starting
[4I6IG] 2022/07/02 12:14:09 INFO: My name is "c2022061103720"
[4I6IG] 2022/07/02 12:14:09 WARNING: Syncthing should not run as a privileged or system user. Please consider using a normal user account.
[4I6IG] 2022/07/02 12:14:09 INFO: Ready to synchronize "Default Folder" (default) (sendreceive)
[4I6IG] 2022/07/02 12:14:09 INFO: Completed initial scan of sendreceive folder "Default Folder" (default)
[4I6IG] 2022/07/02 12:14:10 INFO: quic://0.0.0.0:22000 detected NAT type: Full cone NAT
[4I6IG] 2022/07/02 12:14:10 INFO: quic://0.0.0.0:22000 resolved external address quic://156.247.14.1:22000 (via stun.syncthing.net:3478)
[4I6IG] 2022/07/02 12:14:19 INFO: Detected 0 NAT services
[4I6IG] 2022/07/02 12:15:07 INFO: Joined relay relay://45.33.16.96:443
Syncthing 默认监听以下几个端口:
22000 (TCP) --节点访问端口
8384 (TCP) --Web控制端口
21027 (UDP)
44647 (UDP)
37269 (UDP)
开放防火墙端口请根据自己服务器的情况来设置,使用CTRL + C停止运行。修改生成的配置文件,定位到/root/.config/syncthing/config.xml, 将127.0.0.1:8384改成 0.0.0.0:8384 即可。
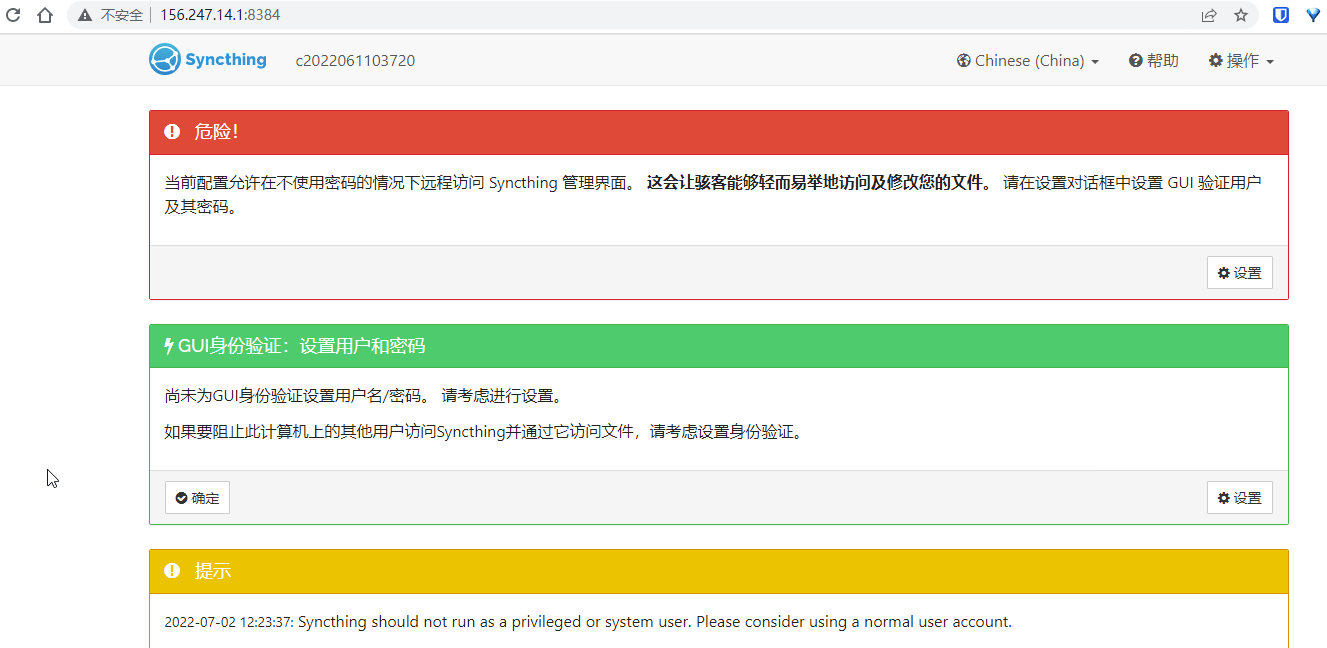
现在 Linux 版本的 Syncthing 已经搭建完成,输入syncthing运行它。然后就可以在浏览器输入你的服务器IP:8384访问管理它了。
2.4 Syncthing域名
- 网站:https://docs.syncthing.net/users/reverseproxy.html
(可选)这一步是可选,毕竟VPS主机用IP地址也可以直接使用Syncthing,但是想要长期使用建议还是上域名+SSL证书,这样可以保证安全性和便捷性。免费域名申请:免费域名.tk,.ml,.ga,.cf,.gq申请注册和DNS解析。
首先,在VPS主机上安装好Nginx,建议使用Oneinstack或者LNMP一键安装包,在安装时仅选择安装Nginx即可。
然后在Oneinstack或者LNMP一键安装包中添加网站,绑定好域名,一键设置好SSL证书。最后,打开域名的Nginx配置文件,参考以下反向绑定域名配置文件:
server {
  listen 80;
  listen [::]:80;
  listen 443 ssl http2;
  listen [::]:443 ssl http2;
  ssl_certificate /usr/local/nginx/conf/ssl/hczj.wzfou.me.crt;
  ssl_certificate_key /usr/local/nginx/conf/ssl/hczj.wzfou.me.key;
  ssl_protocols TLSv1 TLSv1.1 TLSv1.2 TLSv1.3;
  ssl_ciphers TLS13-AES-256-GCM-SHA384:TLS13-CHACHA20-POLY1305-SHA256:TLS13-AES-128-GCM-SHA256:TLS13-AES-128-CCM-8-SHA256:TLS13-AES-128-CCM-SHA256:EECDH+CHACHA20:EECDH+AES128:RSA+AES128:EECDH+AES256:RSA+AES256:EECDH+3DES:RSA+3DES:!MD5;
  ssl_prefer_server_ciphers on;
  ssl_session_timeout 10m;
  ssl_session_cache builtin:1000 shared:SSL:10m;
  ssl_buffer_size 1400;
  add_header Strict-Transport-Security max-age=15768000;
  ssl_stapling on;
  ssl_stapling_verify on;
  server_name hczj.wzfou.me;
  access_log /data/wwwlogs/hczj.wzfou.me_nginx.log combined;
  index index.html index.htm index.php;
  root /data/wwwroot/hczj.wzfou.me;
  if ($ssl_protocol = "") { return 301 https://$host$request_uri; }

  include /usr/local/nginx/conf/rewrite/none.conf;
  #error_page 404 /404.html;
  #error_page 502 /502.html;

#反向绑定域名部分
location / {
  proxy_set_header        Host $host;
  proxy_set_header        X-Real-IP $remote_addr;
  proxy_set_header        X-Forwarded-For $proxy_add_x_forwarded_for;
  proxy_set_header        X-Forwarded-Proto $scheme;

  proxy_pass              http://localhost:8384/;

  proxy_read_timeout      600s;
  proxy_send_timeout      600s;
}
#反向绑定域名部分

}
Syncthing使用域名+SSL证书访问如下:

其它的Web平台域名反向绑定域名配置如下:
Apache
首先确认开启Apache module,命令是: a2enmod proxy_http headers.
然后添加以下配置到你的 Apache httpd configuration:
<Location />
    ProxyPass http://localhost:8384/
    ProxyPassReverse http://localhost:8384/
    RequestHeader set "X-Forwarded-Proto" expr=%{REQUEST_SCHEME}
    Require all granted
</Location>
Caddy
proxy / localhost:8384 {
    transparent
}

timeouts {
    read none
    write none
    header none
}
Caddy v2
handle_path /* {
    uri strip_prefix /
    reverse_proxy http://localhost:8384 {
            header_up Host {upstream_hostport}
            header_up X-Forwarded-Host {host}
    }
}
三、Syncthing同步设置
3.1 添加同步设备
假设你现在有A、B两台设设备要同步。A为本地电脑PC,B为VPS主机服务端,首先在本地电脑PC上设置一个你想要同步的文件夹。
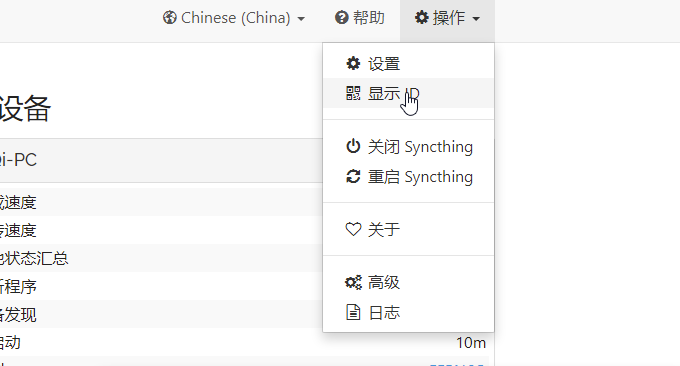
然后点击右上角,显示ID。
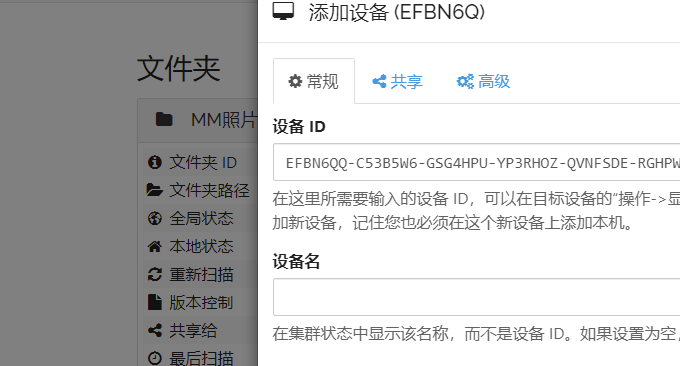
然后,到VPS主机服务器B点击添加远程设备。

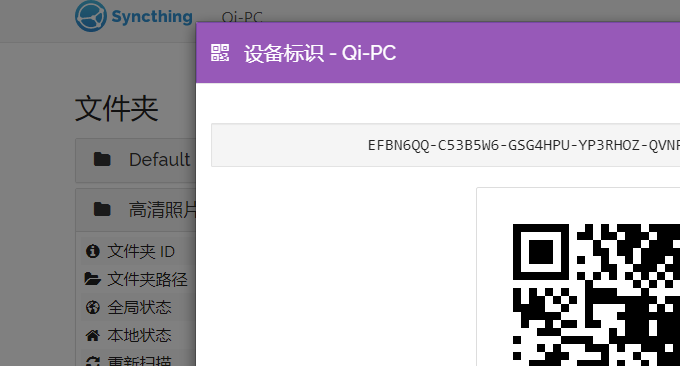
输入设备ID,确认保存。
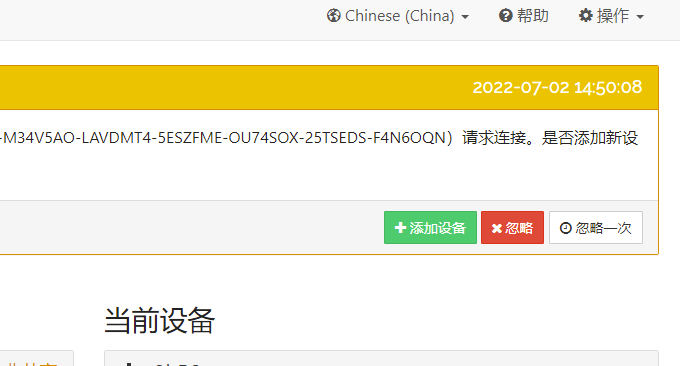
这时在A处可以看到提示,询问你是否允许添加远程设备。
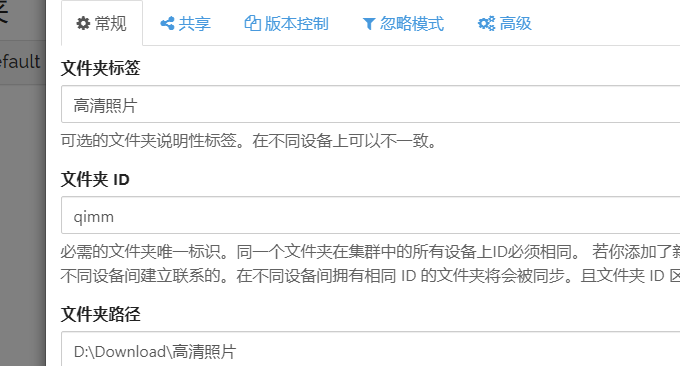
3.2 添加同步文件夹
同意之后,你就可以将本地电脑PC的想要共享出来的文件夹,添加进来,允许共享。
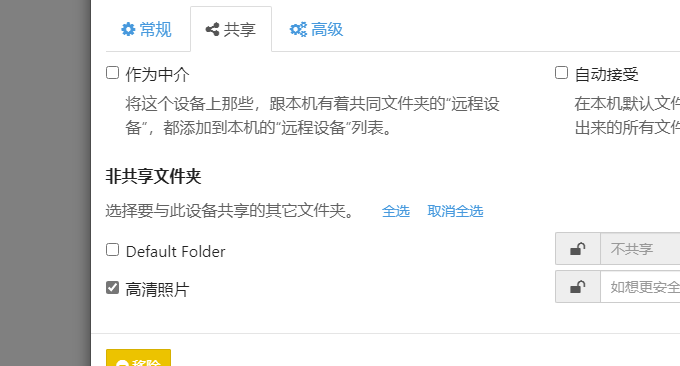
现在你在本地电脑PC上任何操作就会自动同步到VPS主机服务端了,当然在VPS主机服务器端的任何操作也会同步到本地电脑PC端了。

3.3 实现实时同步
在Syncthing可以看到实时同步速度。
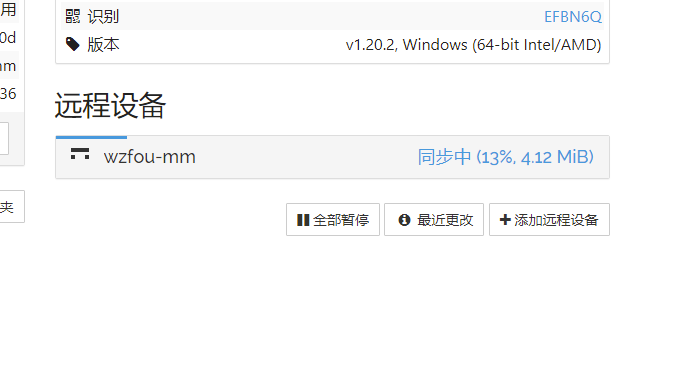
Syncthing同步完成后,你在任意一个客户端或者服务端能看到文件变化。
Syncthing的日志也会详细记录你的同步记录。

四、Syncthing使用问题
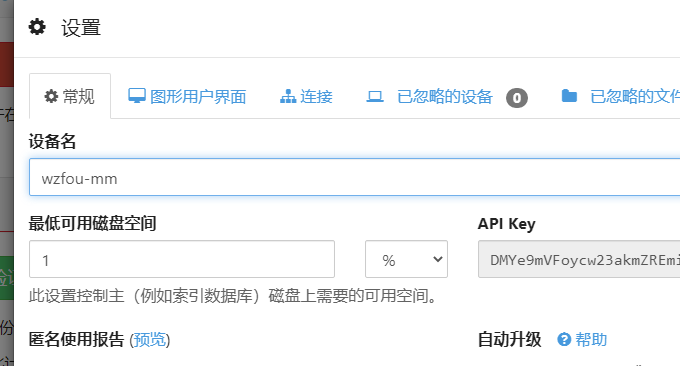
4.1 设置管理密码
Syncthing默认的是不需要密码就可以进入管理的,如果你把Syncthing运行在服务端的话,最好是设置一个密码。

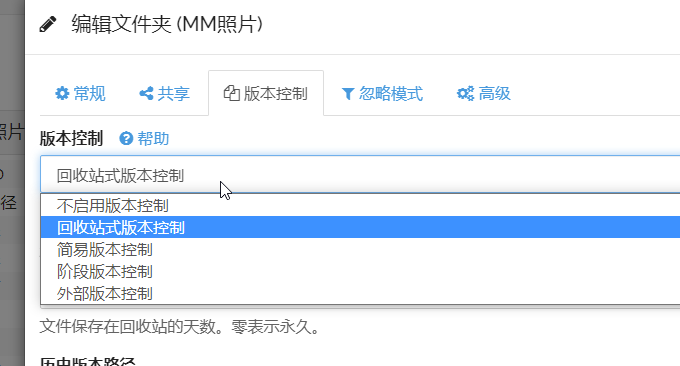
4.2 文件版本控制
Syncthing支持文件版本控制,如果你误删除了文件,还可以从这里找回来。
4.3 忽略文件同步
“忽略模式”允许用户排除主文件夹下不想被同步的文件夹或内容,需要用到通配符。

通配符如下:
星号 (*) 匹配文件名中的零个或多个字符,但不匹配目录分隔符。 te*ne 匹配电话、子目录/电话但不匹配电话/电话。
双星号 (**) 与上述匹配,但也匹配目录分隔符。 te**ne 匹配电话、子目录/电话和电话/子/目录/电话。
问号 (?) 匹配不是目录分隔符的单个字符。 te??st 匹配 tebest 但不匹配 teb/st 或 test。
方括号 ([]) 表示字符范围:[a-z] 匹配任何小写字符。
花括号 ({}) 表示一组逗号分隔的替代项:{banana,pineapple} 匹配香蕉或菠萝。
反斜杠 (\) “转义”一个特殊字符,使其失去其特殊含义。例如,\{banana\} 与 {banana} 完全匹配,并且不表示上面的一组替代项。
4.4 禁止IP访问
如果你已经成功绑定了域名到Syncthing,想要禁止使用IP访问Syncthing,那么把配置文件作如下修改即可。
把端口设置成:0.0.0.0:8384,那么syncthing可以通过ip进行访问 。
把端口设置成:127.0.0.1:8384,那么只能通过域名访问,这个时候只有通过nginx代*%¥理才能访问到127.0.0.1这个本地地址。
4.5 加快传输速度
如果你的Syncthing终端设备处于局域网内,系统会进行网络寻址数据流不会经过路由器直接在局域网内同步。如果你的Syncthing终端设备没在一个局域网也没有对应的公网 IP ,Syncthing 通过它分布全球的中继服务器进行数据同步。
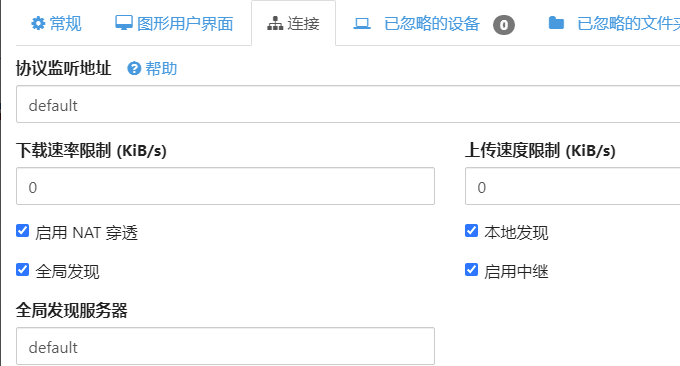
但是这样的话速度会慢了,如果你是用VPS主机架构的Syncthing,我们完全可以让Syncthing直接使用VPS主机的带宽来传输,这样可以加快Syncthing传输速度了。在设置当中关闭“全球发现”和“NAT服务”。
4.6 Syncthing迁移
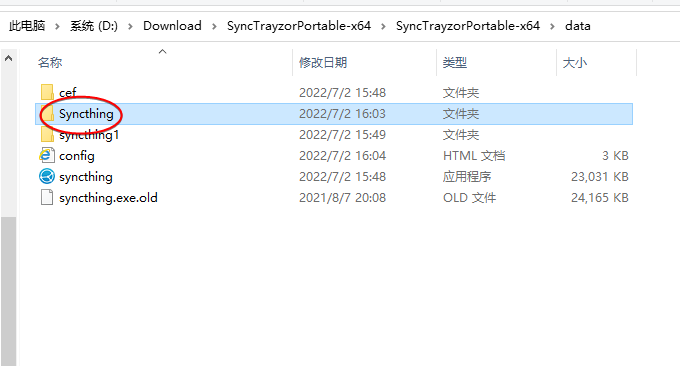
官方原装的Syncthing程序已经可以满足大部分人的需求了,不过有人会更喜欢软件版的Syncthing程序,两者其实是可以相互迁移的。原装的Syncthing程序的数据一般是保存在以下路径:
C:\Users\Qi\AppData\Local\Syncthing
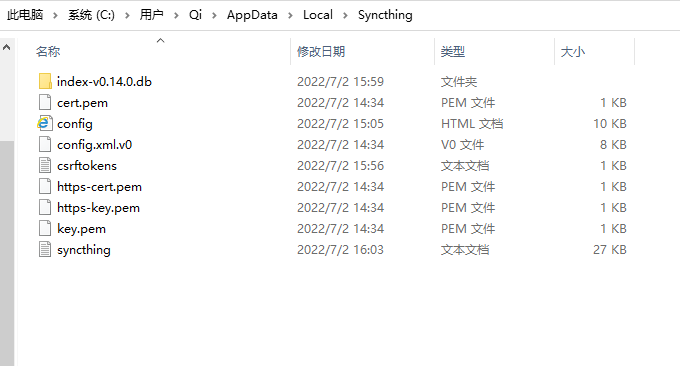
将这个Syncthing文件夹替换SyncTrayzor这类软件版的Syncthing程序下的Syncthing文件夹即可。
4.7 保持后台运行
对于VPS主机运行syncthing如果关闭终端,syncthing也会停止运行,可以将syncthing放在后台,命令如下:
nohup syncthing &
4.8 开机自动运行
- 网站:https://docs.syncthing.net/users/autostart.html
采用 Supervisord 开机自动启动并保持运行
进入 /etc/supervisor/conf.d/ 新建文件命名syncthing.conf ,用以下内容替换(记得把<USERNAME> 替换成你自己的用户名,例如root):
[program:syncthing]
autorestart = True
directory = /home/<USERNAME>/
user = <USERNAME>
command = /usr/bin/syncthing --no-browser --home="/home/<USERNAME>/.config/syncthing"
environment = STNORESTART="1", HOME="/home/<USERNAME>"
重新加载 Supervisord:
supervisorctl reload
启动:
supervisorctl start syncthing
检查是否正常:
supervisorctl status syncthing
有错误可以查看日志:
supervisorctl tail syncthing
采用 systemd开机自动启动并保持运行
直接添加一个配置文件:
vim /usr/lib/systemd/system/syncthing@.service
加入以下内容
 [Unit]
 Description=Syncthing - Open Source Continuous File Synchronization for %I
 Documentation=man:syncthing(1)
 After=network.target

 [Service]
 User=%i
 ExecStart=/usr/local/bin/syncthing -no-browser -no-restart -logflags=0
 Restart=on-failure
 SuccessExitStatus=3 4
 RestartForceExitStatus=3 4

 [Install]
 WantedBy=multi-user.target
然后保存退出,之后就可以通过systemd进行启动和管理了,注意注意把命令里面的root替换成自己的用户名:
 # 启动syncthing
 systemctl start syncthing@root.service

 # 查看syncthing运行状态
 systemctl status syncthing@root.service

 # 停止syncthing
 systemctl stop syncthing@root.service

 # 设置syncthing开机自启
 systemctl enable syncthing@root.service

 # 关闭syncthing开机自启
 systemctl disable syncthing@root.service
或者可以用--user参数来运行
1systemctl –root start syncthing
文章出自:挖站否 https://wzfou.com/syncthing/,版权所有。本站文章除注明出处外,皆为作者原创文章,可自由引用,但请注明来源。


关于站长(Qi),2008年开始混迹于免费资源圈中,有幸结识了不少的草根站长。之后自己摸爬滚打潜心学习Web服务器、VPS、域名等,兴趣广泛,杂而不精,但愿将自己经验与心得分享出来与大家共勉。


猜你喜欢


-
-

现在好像没有了。[可爱]
2025年7月8日 14:22-

说错了,是微力同步[偷笑]
2025年7月8日 14:25-
好的,我去试试。
2025年8月12日 11:55
-
-
-
-

4.7 保持后台运行写错了
应该是:nohup syncthing &> /dev/null &2022年11月6日 22:48-
我的锅,作者没写错。
另外注意,在我测试的版本v1.22.1中
如果想域名饭袋ip加端口,
需要将:x_set_header Host $host;
改成:x_set_header Host ‘127.0.0.1’;
参考:
https://docs.syncthing.net/users/faq.html#why-do-i-get-host-check-error-in-the-gui-api
https://docs.syncthing.net/users/config.html#config-option-gui.insecureskiphostcheck2022年11月6日 23:26-
非常感谢。
2022年11月7日 20:34
-
-
-

同步还是不错的
2022年9月20日 15:00 -

这个功能很强呀
2022年9月17日 20:59
你可以试一下微云同步,用过微云同步后 我就不想用这个了